HarmonyOS实战开发:MVVM模式
应用通过状态去渲染更新UI是程序设计中相对复杂,但又十分重要的,往往决定了应用程序的性能。
应用通过状态去渲染更新UI是程序设计中相对复杂,但又十分重要的,往往决定了应用程序的性能。程序的状态数据通常包含了数组、对象,或者是嵌套对象组合而成。在这些情况下,ArkUI采取MVVM = Model + View + ViewModel模式,其中状态管理模块起到的就是ViewModel的作用,将数据与视图绑定在一起,更新数据的时候直接更新视图。
-
Model层:存储数据和相关逻辑的模型。它表示组件或其他相关业务逻辑之间传输的数据。Model是对原始数据的进一步处理。
-
View层:在ArkUI中通常是@Components修饰组件渲染的UI。
-
ViewModel层:在ArkUI中,ViewModel是存储在自定义组件的状态变量、LocalStorage和AppStorage中的数据。
- 自定义组件通过执行其build()方法或者@Builder装饰的方法来渲染UI,即ViewModel可以渲染View。
- View可以通过相应event handler来改变ViewModel,即事件驱动ViewModel的改变,另外ViewModel提供了@Watch回调方法用于监听状态数据的改变。
- 在ViewModel被改变时,需要同步回Model层,这样才能保证ViewModel和Model的一致性,即应用自身数据的一致性。
- ViewModel结构设计应始终为了适配自定义组件的构建和更新,这也是将Model和ViewModel分开的原因。
目前很多关于UI构造和更新的问题,都是由于ViewModel的设计并没有很好的支持自定义组件的渲染,或者试图去让自定义组件强行适配Model层,而中间没有用ViewModel来进行分离。例如,一个应用程序直接将SQL数据库中的数据读入内存,这种数据模型不能很好的直接适配自定义组件的渲染,所以在应用程序开发中需要适配ViewModel层。

根据上面涉及SQL数据库的示例,应用程序应设计为:
-
Model:针对数据库高效操作的数据模型。
-
ViewModel:针对ArkUI状态管理功能进行高效的UI更新的视图模型。
-
部署 converters/adapters: converters/adapters作用于Model和ViewModel的相互转换。
- converters/adapters可以转换最初从数据库读取的Model,来创建并初始化ViewModel。
- 在应用的使用场景中,UI会通过event handler改变ViewModel,此时converters/adapters需要将ViewModel的更新数据同步回Model。
虽然与强制将UI拟合到SQL数据库模式(MV模式)相比,MVVM的设计比较复杂,但应用程序开发人员可以通过ViewModel层的隔离,来简化UI的设计和实现,以此来收获更好的UI性能。
ViewModel的数据源
ViewModel通常包含多个顶层数据源。@State和@Provide装饰的变量以及LocalStorage和AppStorage都是顶层数据源,其余装饰器都是与数据源做同步的数据。装饰器的选择取决于状态需要在自定义组件之间的共享范围。共享范围从小到大的排序是:
-
@State:组件级别的共享,通过命名参数机制传递,例如:CompA: ({ aProp: this.aProp }),表示传递层级(共享范围)是父子之间的传递。
-
@Provide:组件级别的共享,可以通过key和@Consume绑定,因此不用参数传递,实现多层级的数据共享,共享范围大于@State。
-
LocalStorage:页面级别的共享,可以通过@Entry在当前组件树上共享LocalStorage实例。
-
AppStorage:应用全局的UI状态存储,和应用进程绑定,在整个应用内的状态数据的共享。
@State装饰的变量与一个或多个子组件共享状态数据
@State可以初始化多种状态变量,@Prop、@Link和@ObjectLink可以和其建立单向或双向同步,详情见@State使用规范。
-
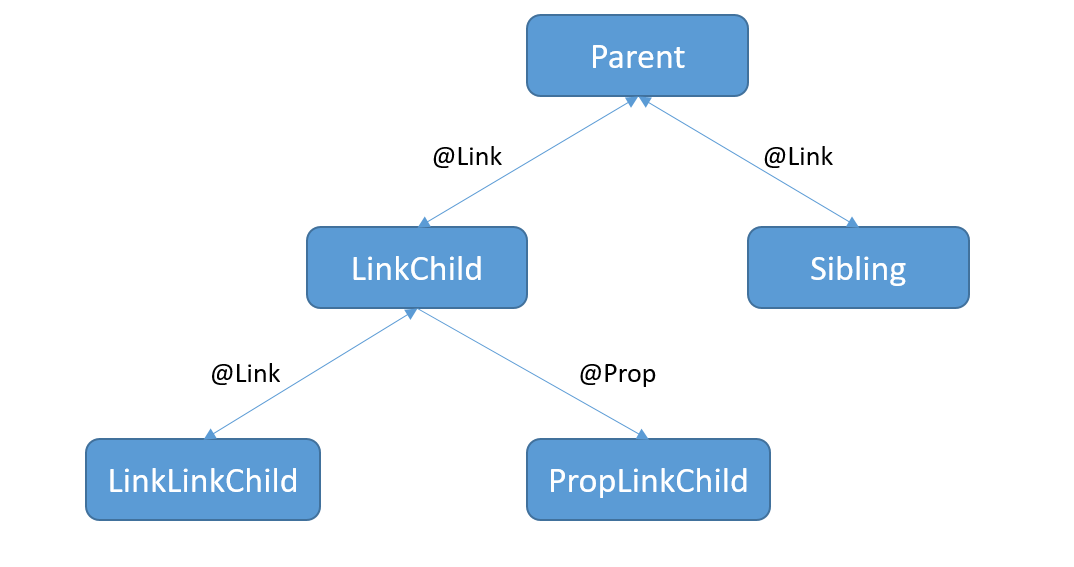
使用Parent根节点中@State装饰的testNum作为ViewModel数据项。将testNum传递给其子组件LinkChild和Sibling。
// xxx.ets @Entry @Component struct Parent { @State @Watch("testNumChange1") testNum: number = 1; testNumChange1(propName: string): void { console.log(`Parent: testNumChange value ${this.testNum}`) } build() { Column() { LinkChild({ testNum: $testNum }) Sibling({ testNum: $testNum }) } } } -
LinkChild和Sibling中用@Link和父组件的数据源建立双向同步。其中LinkChild中创建了LinkLinkChild和PropLinkChild。
@Component struct Sibling { @Link @Watch("testNumChange") testNum: number; testNumChange(propName: string): void { console.log(`Sibling: testNumChange value ${this.testNum}`); } build() { Text(`Sibling: ${this.testNum}`) } } @Component struct LinkChild { @Link @Watch("testNumChange") testNum: number; testNumChange(propName: string): void { console.log(`LinkChild: testNumChange value ${this.testNum}`); } build() { Column() { Button('incr testNum') .onClick(() => { console.log(`LinkChild: before value change value ${this.testNum}`); this.testNum = this.testNum + 1 console.log(`LinkChild: after value change value ${this.testNum}`); }) Text(`LinkChild: ${this.testNum}`) LinkLinkChild({ testNumGrand: $testNum }) PropLinkChild({ testNumGrand: this.testNum }) } .height(200).width(200) } } -
LinkLinkChild和PropLinkChild声明如下,PropLinkChild中的@Prop和其父组件建立单向同步关系。
@Component
struct LinkLinkChild {
  @Link @Watch("testNumChange") testNumGrand: number;

  testNumChange(propName: string): void {
    console.log(`LinkLinkChild: testNumGrand value ${this.testNumGrand}`);
  }

  build() {
    Text(`LinkLinkChild: ${this.testNumGrand}`)
  }
}


@Component
struct PropLinkChild {
  @Prop @Watch("testNumChange") testNumGrand: number = 0;

  testNumChange(propName: string): void {
    console.log(`PropLinkChild: testNumGrand value ${this.testNumGrand}`);
  }

  build() {
    Text(`PropLinkChild: ${this.testNumGrand}`)
      .height(70)
      .backgroundColor(Color.Red)
      .onClick(() => {
        this.testNumGrand += 1;
      })
  }
}
当LinkChild中的@Link testNum更改时。
-
更改首先同步到其父组件Parent,然后更改从Parent同步到Siling。
-
LinkChild中的@Link testNum更改也同步给子组件LinkLinkChild和PropLinkChild。
@State装饰器与@Provide、LocalStorage、AppStorage的区别:
- @State如果想要将更改传递给孙子节点,需要先将更改传递给子组件,再从子节点传递给孙子节点。
- 共享只能通过构造函数的参数传递,即命名参数机制CompA: ({ aProp: this.aProp })。
完整的代码示例如下:
-
@Component
struct LinkLinkChild {
  @Link @Watch("testNumChange") testNumGrand: number;

  testNumChange(propName: string): void {
    console.log(`LinkLinkChild: testNumGrand value ${this.testNumGrand}`);
  }

  build() {
    Text(`LinkLinkChild: ${this.testNumGrand}`)
  }
}


@Component
struct PropLinkChild {
  @Prop @Watch("testNumChange") testNumGrand: number = 0;

  testNumChange(propName: string): void {
    console.log(`PropLinkChild: testNumGrand value ${this.testNumGrand}`);
  }

  build() {
    Text(`PropLinkChild: ${this.testNumGrand}`)
      .height(70)
      .backgroundColor(Color.Red)
      .onClick(() => {
        this.testNumGrand += 1;
      })
  }
}


@Component
struct Sibling {
  @Link @Watch("testNumChange") testNum: number;

  testNumChange(propName: string): void {
    console.log(`Sibling: testNumChange value ${this.testNum}`);
  }

  build() {
    Text(`Sibling: ${this.testNum}`)
  }
}

@Component
struct LinkChild {
  @Link @Watch("testNumChange") testNum: number;

  testNumChange(propName: string): void {
    console.log(`LinkChild: testNumChange value ${this.testNum}`);
  }

  build() {
    Column() {
      Button('incr testNum')
        .onClick(() => {
          console.log(`LinkChild: before value change value ${this.testNum}`);
          this.testNum = this.testNum + 1
          console.log(`LinkChild: after value change value ${this.testNum}`);
        })
      Text(`LinkChild: ${this.testNum}`)
      LinkLinkChild({ testNumGrand: $testNum })
      PropLinkChild({ testNumGrand: this.testNum })
    }
    .height(200).width(200)
  }
}


@Entry
@Component
struct Parent {
  @State @Watch("testNumChange1") testNum: number = 1;

  testNumChange1(propName: string): void {
    console.log(`Parent: testNumChange value ${this.testNum}`)
  }

  build() {
    Column() {
      LinkChild({ testNum: $testNum })
      Sibling({ testNum: $testNum })
    }
  }
}
@Provide装饰的变量与任何后代组件共享状态数据
@Provide装饰的变量可以与任何后代组件共享状态数据,其后代组件使用@Consume创建双向同步,详情见@Provide和@Consume。
因此,@Provide-@Consume模式比使用@State-@Link-@Link从父组件将更改传递到孙子组件更方便。@Provide-@Consume适合在单个页面UI组件树中共享状态数据。
使用@Provide-@Consume模式时,@Consume和其祖先组件中的@Provide通过绑定相同的key连接,而不是在组件的构造函数中通过参数来进行传递。
以下示例通过@Provide-@Consume模式,将更改从父组件传递到孙子组件。
@Component
struct LinkLinkChild {
  @Consume @Watch("testNumChange") testNum: number;

  testNumChange(propName: string): void {
    console.log(`LinkLinkChild: testNum value ${this.testNum}`);
  }

  build() {
    Text(`LinkLinkChild: ${this.testNum}`)
  }
}

@Component
struct PropLinkChild {
  @Prop @Watch("testNumChange") testNumGrand: number = 0;

  testNumChange(propName: string): void {
    console.log(`PropLinkChild: testNumGrand value ${this.testNumGrand}`);
  }

  build() {
    Text(`PropLinkChild: ${this.testNumGrand}`)
      .height(70)
      .backgroundColor(Color.Red)
      .onClick(() => {
        this.testNumGrand += 1;
      })
  }
}

@Component
struct Sibling {
  @Consume @Watch("testNumChange") testNum: number;

  testNumChange(propName: string): void {
    console.log(`Sibling: testNumChange value ${this.testNum}`);
  }

  build() {
    Text(`Sibling: ${this.testNum}`)
  }
}

@Component
struct LinkChild {
  @Consume @Watch("testNumChange") testNum: number;

  testNumChange(propName: string): void {
    console.log(`LinkChild: testNumChange value ${this.testNum}`);
  }

  build() {
    Column() {
      Button('incr testNum')
        .onClick(() => {
          console.log(`LinkChild: before value change value ${this.testNum}`);
          this.testNum = this.testNum + 1
          console.log(`LinkChild: after value change value ${this.testNum}`);
        })
      Text(`LinkChild: ${this.testNum}`)
      LinkLinkChild({ /* empty */ })
      PropLinkChild({ testNumGrand: this.testNum })
    }
    .height(200).width(200)
  }
}

@Entry
@Component
struct Parent {
  @Provide @Watch("testNumChange1") testNum: number = 1;

  testNumChange1(propName: string): void {
    console.log(`Parent: testNumChange value ${this.testNum}`)
  }

  build() {
    Column() {
      LinkChild({ /* empty */ })
      Sibling({ /* empty */ })
    }
  }
}
给LocalStorage实例中对应的属性建立双向或单向同步
通过@LocalStorageLink和@LocalStorageProp,给LocalStorage实例中的属性建立双向或单向同步。可以将LocalStorage实例视为@State变量的Map,使用详情参考LocalStorage。
LocalStorage对象可以在ArkUI应用程序的几个页面上共享。因此,使用@LocalStorageLink、@LocalStorageProp和LocalStorage可以在应用程序的多个页面上共享状态。
以下示例中:
-
创建一个LocalStorage实例,并通过@Entry(storage)将其注入根节点。
-
在Parent组件中初始化@LocalStorageLink("testNum")变量时,将在LocalStorage实例中创建testNum属性,并设置指定的初始值为1,即@LocalStorageLink("testNum") testNum: number = 1。
-
在其子组件中,都使用@LocalStorageLink或@LocalStorageProp绑定同一个属性名key来传递数据。
LocalStorage可以被认为是@State变量的Map,属性名作为Map中的key。
@LocalStorageLink和LocalStorage中对应的属性的同步行为,和@State和@Link一致,都为双向数据同步。
以下为组件的状态更新图:

@Component
struct LinkLinkChild {
  @LocalStorageLink("testNum") @Watch("testNumChange") testNum: number = 1;

  testNumChange(propName: string): void {
    console.log(`LinkLinkChild: testNum value ${this.testNum}`);
  }

  build() {
    Text(`LinkLinkChild: ${this.testNum}`)
  }
}

@Component
struct PropLinkChild {
  @LocalStorageProp("testNum") @Watch("testNumChange") testNumGrand: number = 1;

  testNumChange(propName: string): void {
    console.log(`PropLinkChild: testNumGrand value ${this.testNumGrand}`);
  }

  build() {
    Text(`PropLinkChild: ${this.testNumGrand}`)
      .height(70)
      .backgroundColor(Color.Red)
      .onClick(() => {
        this.testNumGrand += 1;
      })
  }
}

@Component
struct Sibling {
  @LocalStorageLink("testNum") @Watch("testNumChange") testNum: number = 1;

  testNumChange(propName: string): void {
    console.log(`Sibling: testNumChange value ${this.testNum}`);
  }

  build() {
    Text(`Sibling: ${this.testNum}`)
  }
}

@Component
struct LinkChild {
  @LocalStorageLink("testNum") @Watch("testNumChange") testNum: number = 1;

  testNumChange(propName: string): void {
    console.log(`LinkChild: testNumChange value ${this.testNum}`);
  }

  build() {
    Column() {
      Button('incr testNum')
        .onClick(() => {
          console.log(`LinkChild: before value change value ${this.testNum}`);
          this.testNum = this.testNum + 1
          console.log(`LinkChild: after value change value ${this.testNum}`);
        })
      Text(`LinkChild: ${this.testNum}`)
      LinkLinkChild({ /* empty */ })
      PropLinkChild({ /* empty */ })
    }
    .height(200).width(200)
  }
}

// create LocalStorage object to hold the data
const storage = new LocalStorage();
@Entry(storage)
@Component
struct Parent {
  @LocalStorageLink("testNum") @Watch("testNumChange1") testNum: number = 1;

  testNumChange1(propName: string): void {
    console.log(`Parent: testNumChange value ${this.testNum}`)
  }

  build() {
    Column() {
      LinkChild({ /* empty */ })
      Sibling({ /* empty */ })
    }
  }
}
给AppStorage中对应的属性建立双向或单向同步
AppStorage是LocalStorage的单例对象,ArkUI在应用程序启动时创建该对象,在页面中使用@StorageLink和@StorageProp为多个页面之间共享数据,具体使用方法和LocalStorage类似。
也可以使用PersistentStorage将AppStorage中的特定属性持久化到本地磁盘的文件中,再次启动的时候@StorageLink和@StorageProp会恢复上次应用退出的数据。
示例如下:
@Component
struct LinkLinkChild {
  @StorageLink("testNum") @Watch("testNumChange") testNum: number = 1;

  testNumChange(propName: string): void {
    console.log(`LinkLinkChild: testNum value ${this.testNum}`);
  }

  build() {
    Text(`LinkLinkChild: ${this.testNum}`)
  }
}

@Component
struct PropLinkChild {
  @StorageProp("testNum") @Watch("testNumChange") testNumGrand: number = 1;

  testNumChange(propName: string): void {
    console.log(`PropLinkChild: testNumGrand value ${this.testNumGrand}`);
  }

  build() {
    Text(`PropLinkChild: ${this.testNumGrand}`)
      .height(70)
      .backgroundColor(Color.Red)
      .onClick(() => {
        this.testNumGrand += 1;
      })
  }
}

@Component
struct Sibling {
  @StorageLink("testNum") @Watch("testNumChange") testNum: number = 1;

  testNumChange(propName: string): void {
    console.log(`Sibling: testNumChange value ${this.testNum}`);
  }

  build() {
    Text(`Sibling: ${this.testNum}`)
  }
}

@Component
struct LinkChild {
  @StorageLink("testNum") @Watch("testNumChange") testNum: number = 1;

  testNumChange(propName: string): void {
    console.log(`LinkChild: testNumChange value ${this.testNum}`);
  }

  build() {
    Column() {
      Button('incr testNum')
        .onClick(() => {
          console.log(`LinkChild: before value change value ${this.testNum}`);
          this.testNum = this.testNum + 1
          console.log(`LinkChild: after value change value ${this.testNum}`);
        })
      Text(`LinkChild: ${this.testNum}`)
      LinkLinkChild({ /* empty */
      })
      PropLinkChild({ /* empty */
      })
    }
    .height(200).width(200)
  }
}


@Entry
@Component
struct Parent {
  @StorageLink("testNum") @Watch("testNumChange1") testNum: number = 1;

  testNumChange1(propName: string): void {
    console.log(`Parent: testNumChange value ${this.testNum}`)
  }

  build() {
    Column() {
      LinkChild({ /* empty */
      })
      Sibling({ /* empty */
      })
    }
  }
}
ViewModel的嵌套场景
大多数情况下,ViewModel数据项都是复杂类型的,例如,对象数组、嵌套对象或者这些类型的组合。对于嵌套场景,可以使用@Observed搭配@Prop或者@ObjectLink来观察变化。
@Prop和@ObjectLink嵌套数据结构
推荐设计单独的@Component来渲染每一个数组或对象。此时,对象数组或嵌套对象(属性是对象的对象称为嵌套对象)需要两个@Component,一个@Component呈现外部数组/对象,另一个@Component呈现嵌套在数组/对象内的类对象。 @Prop、@Link、@ObjectLink修饰的变量只能观察到第一层的变化。
-
对于类:
- 可以观察到赋值的变化:this.obj=new ClassObj(...)
- 可以观察到对象属性的更改:this.obj.a=new ClassA(...)
- 不能观察更深层级的属性更改:this.obj.a.b = 47
-
对于数组:
- 可以观察到数组的整体赋值:this.arr=[...]
- 可以观察到数据项的删除、插入和替换:this.arr[1] = new ClassA(); this.arr.pop(); this.arr.push(new ClassA(...)))、this.arr.sort(...)
- 不能观察更深层级的数组变化:this.arr[1].b = 47
如果要观察嵌套类的内部对象的变化,可以使用@ObjectLink或@Prop。优先考虑@ObjectLink,其通过嵌套对象内部属性的引用初始化自身。@Prop会对嵌套在内部的对象的深度拷贝来进行初始化,以实现单向同步。在性能上@Prop的深度拷贝比@ObjectLink的引用拷贝慢很多。
@ObjectLink或@Prop可以用来存储嵌套内部的类对象,该类必须用@Observed类装饰器装饰,否则类的属性改变并不会触发更新UI并不会刷新。@Observed为其装饰的类实现自定义构造函数,此构造函数创建了一个类的实例,并使用ES6代理包装(由ArkUI框架实现),拦截修饰class属性的所有“get”和“set”。“set”观察属性值,当发生赋值操作时,通知ArkUI框架更新。“get”收集哪些UI组件依赖该状态变量,实现最小化UI更新。
如果嵌套场景中,嵌套数据内部是数组或者class时,需根据以下场景使用@Observed类装饰器。
-
如果嵌套数据内部是class,直接被@Observed装饰。
-
如果嵌套数据内部是数组,可以通过以下方式来观察数组变化。
@Observed class ObservedArray<T> extends Array<T> {
    constructor(args: T[]) {
        super(...args);
    }
    /* otherwise empty */
}
ViewModel为外层class。
class Outer {
  innerArrayProp : ObservedArray<string> = [];
  ...
}
嵌套数据结构中@Prop和@ObjectLink之的区别
以下示例中:
-
父组件ViewB渲染@State arrA:Array<ClassA>。@State可以观察新数组的分配、数组项插入、删除和替换。
-
子组件ViewA渲染每一个ClassA的对象。
-
类装饰器@Observed ClassA与@ObjectLink a: ClassA。
-
可以观察嵌套在Array内的ClassA对象的变化。
-
不使用@Observed时: ViewB中的this.arrA[Math.floor(this.arrA.length/2)].c=10将不会被观察到,相应的ViewA组件也不会更新。
对于数组中的第一个和第二个数组项,每个数组项都初始化了两个ViewA的对象,渲染了同一个ViewA实例。在一个ViewA中的属性赋值this.a.c += 1;时不会引发另外一个使用同一个ClassA初始化的ViewA的渲染更新。
-

let NextID: number = 1;

// 类装饰器@Observed装饰ClassA
@Observed
class ClassA {
  public id: number;
  public c: number;

  constructor(c: number) {
    this.id = NextID++;
    this.c = c;
  }
}

@Component
struct ViewA {
  @ObjectLink a: ClassA;
  label: string = "ViewA1";

  build() {
    Row() {
      Button(`ViewA [${this.label}] this.a.c= ${this.a.c} +1`)
        .onClick(() => {
          // 改变对象属性
          this.a.c += 1;
        })
    }
  }
}

@Entry
@Component
struct ViewB {
  @State arrA: ClassA[] = [new ClassA(0), new ClassA(0)];

  build() {
    Column() {
      ForEach(this.arrA,
        (item: ClassA) => {
          ViewA({ label: `#${item.id}`, a: item })
        },
        (item: ClassA): string => { return item.id.toString(); }
      )

      Divider().height(10)

      if (this.arrA.length) {
        ViewA({ label: `ViewA this.arrA[first]`, a: this.arrA[0] })
        ViewA({ label: `ViewA this.arrA[last]`, a: this.arrA[this.arrA.length-1] })
      }

      Divider().height(10)

      Button(`ViewB: reset array`)
        .onClick(() => {
          // 替换整个数组,会被@State this.arrA观察到
          this.arrA = [new ClassA(0), new ClassA(0)];
        })
      Button(`array push`)
        .onClick(() => {
          // 数组中插入数据,会被@State this.arrA观察到
          this.arrA.push(new ClassA(0))
        })
      Button(`array shift`)
        .onClick(() => {
          // 数组中移除数据,会被@State this.arrA观察到
          this.arrA.shift()
        })
      Button(`ViewB: chg item property in middle`)
        .onClick(() => {
          // 替换数组中的某个元素,会被@State this.arrA观察到
          this.arrA[Math.floor(this.arrA.length / 2)] = new ClassA(11);
        })
      Button(`ViewB: chg item property in middle`)
        .onClick(() => {
          // 改变数组中某个元素的属性c,会被ViewA中的@ObjectLink观察到
          this.arrA[Math.floor(this.arrA.length / 2)].c = 10;
        })
    }
  }
}
在ViewA中,将@ObjectLink替换为@Prop。
@Component
struct ViewA {

  @Prop a: ClassA = new ClassA(0);
  label : string = "ViewA1";

  build() {
     Row() {
        Button(`ViewA [${this.label}] this.a.c= ${this.a.c} +1`)
        .onClick(() => {
            // change object property
            this.a.c += 1;
        })
     }
  }
}
与用@ObjectLink修饰不同,用@ObjectLink修饰时,点击数组的第一个或第二个元素,后面两个ViewA会发生同步的变化。
@Prop是单向数据同步,ViewA内的Button只会触发Button自身的刷新,不会传播到其他的ViewA实例中。在ViewA中的ClassA只是一个副本,并不是其父组件中@State arrA : Array<ClassA>中的对象,也不是其他ViewA的ClassA,这使得数组的元素和ViewA中的元素表面是传入的同一个对象,实际上在UI上渲染使用的是两个互不相干的对象。
需要注意@Prop和@ObjectLink还有一个区别:@ObjectLink装饰的变量是仅可读的,不能被赋值;@Prop装饰的变量可以被赋值。
-
@ObjectLink实现双向同步,因为它是通过数据源的引用初始化的。
-
@Prop是单向同步,需要深拷贝数据源。
-
对于@Prop赋值新的对象,就是简单地将本地的值覆写,但是对于实现双向数据同步的@ObjectLink,覆写新的对象相当于要更新数据源中的数组项或者class的属性,这个对于 TypeScript/JavaScript是不能实现的。
MVVM应用示例
以下示例深入探讨了嵌套ViewModel的应用程序设计,特别是自定义组件如何渲染一个嵌套的Object,该场景在实际的应用开发中十分常见。
开发一个电话簿应用,实现功能如下:
-
显示联系人和设备("Me")电话号码 。
-
选中联系人时,进入可编辑态”Edit“,可以更新该联系人详细信息,包括电话号码,住址。
-
在更新联系人信息时,只有在单击保存“Save Changes”之后,才会保存更改。
-
可以点击删除联系人”Delete Contact“,可以在联系人列表删除该联系人。
ViewModel需要包括:
- AddressBook(class)
- me (设备): 存储一个Person类。
- contacts(设备联系人):存储一个Person类数组。
AddressBook类声明如下:
export class AddressBook {
me: Person;
contacts: ObservedArray<Person>;
constructor(me: Person, contacts: Person[]) {
this.me = me;
this.contacts = new ObservedArray<Person>(contacts);
}
}- Person (class)
- name : string
- address : Address
- phones: ObservedArray<string>
- Address (class)
- street : string
- zip : number
- city : string
Address类声明如下:
@Observed
export class Address {
  street: string;
  zip: number;
  city: string;

  constructor(street: string,
              zip: number,
              city: string) {
    this.street = street;
    this.zip = zip;
    this.city = city;
  }
}
Person类声明如下:
@Observed
export class Person {
  id_: string;
  name: string;
  address: Address;
  phones: ObservedArray<string>;

  constructor(name: string,
              street: string,
              zip: number,
              city: string,
              phones: string[]) {
    this.id_ = `${nextId}`;
    nextId++;
    this.name = name;
    this.address = new Address(street, zip, city);
    this.phones = new ObservedArray<string>(phones);
  }
}
需要注意的是,因为phones是嵌套属性,如果要观察到phones的变化,需要extends array,并用@Observed修饰它。ObservedArray类的声明如下。
@Observed
export class ObservedArray<T> extends Array<T> {
  constructor(args: T[]) {
    console.log(`ObservedArray: ${JSON.stringify(args)} `)
    if (args instanceof Array) {
      super(...args);
    } else {
      super(args)
    }
  }
}- selected : 对Person的引用。
更新流程如下:
- 在根节点PageEntry中初始化所有的数据,将me和contacts和其子组件AddressBookView建立双向数据同步,selectedPerson默认为me,需要注意,selectedPerson并不是PageEntry数据源中的数据,而是数据源中,对某一个Person的引用。 PageEntry和AddressBookView声明如下:
@Component
struct AddressBookView {

    @ObjectLink me : Person;
    @ObjectLink contacts : ObservedArray<Person>;
    @State selectedPerson: Person = new Person("", "", 0, "", []);

    aboutToAppear() {
        this.selectedPerson = this.me;
    }

    build() {
        Flex({ direction: FlexDirection.Column, justifyContent: FlexAlign.Start}) {
            Text("Me:")
            PersonView({person: this.me, phones: this.me.phones, selectedPerson: this.$selectedPerson})

            Divider().height(8)

           ForEach(this.contacts, (contact: Person) => {
             PersonView({ person: contact, phones: contact.phones as ObservedArray<string>, selectedPerson: this.$selectedPerson })
           },
             (contact: Person): string => { return contact.id_; }
           )

            Divider().height(8)

            Text("Edit:")
            PersonEditView({ selectedPerson: this.$selectedPerson, name: this.selectedPerson.name, address: this.selectedPerson.address, phones: this.selectedPerson.phones })
        }
            .borderStyle(BorderStyle.Solid).borderWidth(5).borderColor(0xAFEEEE).borderRadius(5)
    }
}

@Entry
@Component
struct PageEntry {
  @Provide addrBook: AddressBook = new AddressBook(
    new Person("Gigi", "Itamerenkatu 9", 180, "Helsinki", ["18*********", "18*********", "18*********"]),
    [
      new Person("Oly", "Itamerenkatu 9", 180, "Helsinki", ["18*********", "18*********"]),
      new Person("Sam", "Itamerenkatu 9", 180, "Helsinki", ["18*********", "18*********"]),
      new Person("Vivi", "Itamerenkatu 9", 180, "Helsinki", ["18*********", "18*********"]),
    ]);

  build() {
    Column() {
      AddressBookView({ me: this.addrBook.me, contacts: this.addrBook.contacts, selectedPerson: this.addrBook.me })
    }
  }
}- PersonView,即电话簿中联系人姓名和首选电话的View,当用户选中,即高亮当前Person,需要同步回其父组件AddressBookView的selectedPerson,所以需要通过@Link建立双向同步。 PersonView声明如下:
// 显示联系人姓名和首选电话
// 为了更新电话号码,这里需要@ObjectLink person和@ObjectLink phones,
// 显示首选号码不能使用this.person.phones[0],因为@ObjectLink person只代理了Person的属性,数组内部的变化观察不到
// 触发onClick事件更新selectedPerson
@Component
struct PersonView {

    @ObjectLink person : Person;
    @ObjectLink phones :  ObservedArray<string>;

    @Link selectedPerson : Person;

    build() {
        Flex({ direction: FlexDirection.Row, justifyContent: FlexAlign.SpaceBetween }) {
          Text(this.person.name)
          if (this.phones.length > 0) {
            Text(this.phones[0])
          }
        }
        .height(55)
        .backgroundColor(this.selectedPerson.name == this.person.name ? "#ffa0a0" : "#ffffff")
        .onClick(() => {
            this.selectedPerson = this.person;
        })
    }
}-
选中的Person会在PersonEditView中显示详细信息,对于PersonEditView的数据同步分为以下三种方式:
-
在Edit状态通过Input.onChange回调事件接受用户的键盘输入时,在点击“Save Changes”之前,这个修改是不希望同步回数据源的,但又希望刷新在当前的PersonEditView中,所以@Prop深拷贝当前Person的详细信息;
-
PersonEditView通过@Link seletedPerson: Person和AddressBookView的``selectedPerson建立双向同步,当用户点击“Save Changes”的时候,@Prop的修改将被赋值给@Link seletedPerson: Person,这就意味这,数据将被同步回数据源。
-
PersonEditView中通过@Consume addrBook: AddressBook和根节点PageEntry建立跨组件层级的直接的双向同步关系,当用户在PersonEditView界面删除某一个联系人时,会直接同步回PageEntry,PageEntry的更新会通知AddressBookView刷新contracts的列表页。 PersonEditView声明如下:
// 渲染Person的详细信息
// @Prop装饰的变量从父组件AddressBookView深拷贝数据,将变化保留在本地, TextInput的变化只会在本地副本上进行修改。
// 点击 "Save Changes" 会将所有数据的复制通过@Prop到@Link, 同步到其他组件
@Component
struct PersonEditView {

    @Consume addrBook : AddressBook;

    /* 指向父组件selectedPerson的引用 */
    @Link selectedPerson: Person;

    /*在本地副本上编辑,直到点击保存*/
    @Prop name: string = "";
    @Prop address : Address = new Address("", 0, "");
    @Prop phones : ObservedArray<string> = [];

    selectedPersonIndex() : number {
        return this.addrBook.contacts.findIndex((person: Person) => person.id_ == this.selectedPerson.id_);
    }

    build() {
        Column() {
            TextInput({ text: this.name})
                .onChange((value) => {
                    this.name = value;
                  })
            TextInput({text: this.address.street})
                .onChange((value) => {
                    this.address.street = value;
                })

            TextInput({text: this.address.city})
                .onChange((value) => {
                    this.address.city = value;
                })

            TextInput({text: this.address.zip.toString()})
                .onChange((value) => {
                    const result = Number.parseInt(value);
                    this.address.zip= Number.isNaN(result) ? 0 : result;
                })

            if (this.phones.length > 0) {
              ForEach(this.phones,
                (phone: ResourceStr, index?:number) => {
                  TextInput({ text: phone })
                    .width(150)
                    .onChange((value) => {
                      console.log(`${index}. ${value} value has changed`)
                      this.phones[index!] = value;
                    })
                },
                (phone: ResourceStr, index?:number) => `${index}-${phone}`
              )
            }

            Flex({ direction: FlexDirection.Row, justifyContent: FlexAlign.SpaceBetween }) {
                Text("Save Changes")
                    .onClick(() => {
                        // 将本地副本更新的值赋值给指向父组件selectedPerson的引用
                        // 避免创建新对象,在现有属性上进行修改
                        this.selectedPerson.name = this.name;
                        this.selectedPerson.address.street = this.address.street
                        this.selectedPerson.address.city   =  this.address.city
                        this.selectedPerson.address.zip    = this.address.zip
                        this.phones.forEach((phone : string, index : number) => { this.selectedPerson.phones[index] = phone } );
                    })
                if (this.selectedPersonIndex()!=-1) {
                    Text("Delete Contact")
                        .onClick(() => {
                            let index = this.selectedPersonIndex();
                            console.log(`delete contact at index ${index}`);

                            // 删除当前联系人
                            this.addrBook.contacts.splice(index, 1);

                            // 删除当前selectedPerson,选中态前移一位
                            index = (index < this.addrBook.contacts.length) ? index : index-1;

                            // 如果contract被删除完,则设置me为选中态
                            this.selectedPerson = (index>=0) ? this.addrBook.contacts[index] : this.addrBook.me;
                        })
                }
            }

        }
    }
}
其中在关于@ObjectLink和@Link的区别要注意以下几点:
- 在AddressBookView中实现和父组件PageView的双向同步,需要用@ObjectLink me : Person和@ObjectLink contacts : ObservedArray<Person>,而不能用@Link,原因如下:
- @Link需要和其数据源类型完全相同,且仅能观察到第一层的变化;
- @ObjectLink可以被数据源的属性初始化,且代理了@Observed装饰类的属性,可以观察到被装饰类属性的变化。
- 当 联系人姓名 (Person.name) 或者首选电话号码 (Person.phones[0]) 发生更新时,PersonView也需要同步刷新,其中Person.phones[0]属于第二层的更新,如果使用@Link将无法观察到,而且@Link需要和其数据源类型完全相同。所以在PersonView中也需要使用@ObjectLink,即@ObjectLink person : Person和@ObjectLink phones : ObservedArray<string>。

在这个例子中,我们可以大概了解到如何构建ViewModel,在应用的根节点中,ViewModel的数据可能是可以巨大的嵌套数据,但是在ViewModel和View的适配和渲染中,我们尽可能将ViewModel的数据项和View相适配,这样的话在针对每一层的View,都是一个相对“扁平”的数据,仅观察当前层就可以了。
在应用实际开发中,也许我们无法避免去构建一个十分庞大的Model,但是我们可以在UI树状结构中合理地去拆分数据,使得ViewModel和View更好的适配,从而搭配最小化更新来实现高性能开发。
完整应用代码如下:
- 在AddressBookView中实现和父组件PageView的双向同步,需要用@ObjectLink me : Person和@ObjectLink contacts : ObservedArray<Person>,而不能用@Link,原因如下:
-
 // ViewModel classes
 let nextId = 0;

 @Observed
 export class ObservedArray<T> extends Array<T> {
   constructor(args: T[]) {
     console.log(`ObservedArray: ${JSON.stringify(args)} `)
     if (args instanceof Array) {
       super(...args);
     } else {
       super(args)
     }
   }
 }

 @Observed
 export class Address {
   street: string;
   zip: number;
   city: string;

   constructor(street: string,
               zip: number,
               city: string) {
     this.street = street;
     this.zip = zip;
     this.city = city;
   }
 }

 @Observed
 export class Person {
   id_: string;
   name: string;
   address: Address;
   phones: ObservedArray<string>;

   constructor(name: string,
               street: string,
               zip: number,
               city: string,
               phones: string[]) {
     this.id_ = `${nextId}`;
     nextId++;
     this.name = name;
     this.address = new Address(street, zip, city);
     this.phones = new ObservedArray<string>(phones);
   }
 }

 export class AddressBook {
   me: Person;
   contacts: ObservedArray<Person>;

   constructor(me: Person, contacts: Person[]) {
     this.me = me;
     this.contacts = new ObservedArray<Person>(contacts);
   }
 }

 //渲染出Person对象的名称和Observed数组<string>中的第一个号码
 //为了更新电话号码,这里需要@ObjectLink person和@ObjectLink phones,
 //不能使用this.person.phones,内部数组的更改不会被观察到。
 // 在AddressBookView、PersonEditView中的onClick更新selectedPerson
 @Component
 struct PersonView {
   @ObjectLink person: Person;
   @ObjectLink phones: ObservedArray<string>;
   @Link selectedPerson: Person;

   build() {
     Flex({ direction: FlexDirection.Row, justifyContent: FlexAlign.SpaceBetween }) {
       Text(this.person.name)
       if (this.phones.length) {
         Text(this.phones[0])
       }
     }
     .height(55)
     .backgroundColor(this.selectedPerson.name == this.person.name ? "#ffa0a0" : "#ffffff")
     .onClick(() => {
       this.selectedPerson = this.person;
     })
   }
 }

 // 渲染Person的详细信息
 // @Prop装饰的变量从父组件AddressBookView深拷贝数据,将变化保留在本地, TextInput的变化只会在本地副本上进行修改。
 // 点击 "Save Changes" 会将所有数据的复制通过@Prop到@Link, 同步到其他组件
 @Component
 struct PersonEditView {
   @Consume addrBook: AddressBook;

   /* 指向父组件selectedPerson的引用 */
   @Link selectedPerson: Person;

   /*在本地副本上编辑,直到点击保存*/
   @Prop name: string = "";
   @Prop address: Address = new Address("", 0, "");
   @Prop phones: ObservedArray<string> = [];

   selectedPersonIndex(): number {
     return this.addrBook.contacts.findIndex((person: Person) => person.id_ == this.selectedPerson.id_);
   }

   build() {
     Column() {
       TextInput({ text: this.name })
         .onChange((value) => {
           this.name = value;
         })
       TextInput({ text: this.address.street })
         .onChange((value) => {
           this.address.street = value;
         })

       TextInput({ text: this.address.city })
         .onChange((value) => {
           this.address.city = value;
         })

       TextInput({ text: this.address.zip.toString() })
         .onChange((value) => {
           const result = Number.parseInt(value);
           this.address.zip = Number.isNaN(result) ? 0 : result;
         })

       if (this.phones.length > 0) {
         ForEach(this.phones,
           (phone: ResourceStr, index?:number) => {
             TextInput({ text: phone })
               .width(150)
               .onChange((value) => {
                 console.log(`${index}. ${value} value has changed`)
                 this.phones[index!] = value;
               })
           },
           (phone: ResourceStr, index?:number) => `${index}-${phone}`
         )
       }

       Flex({ direction: FlexDirection.Row, justifyContent: FlexAlign.SpaceBetween }) {
         Text("Save Changes")
           .onClick(() => {
             // 将本地副本更新的值赋值给指向父组件selectedPerson的引用
             // 避免创建新对象,在现有属性上进行修改
             this.selectedPerson.name = this.name;
             this.selectedPerson.address.street = this.address.street
             this.selectedPerson.address.city = this.address.city
             this.selectedPerson.address.zip = this.address.zip
             this.phones.forEach((phone: string, index: number) => {
               this.selectedPerson.phones[index] = phone
             });
           })
         if (this.selectedPersonIndex() != -1) {
           Text("Delete Contact")
             .onClick(() => {
               let index = this.selectedPersonIndex();
               console.log(`delete contact at index ${index}`);

               // 删除当前联系人
               this.addrBook.contacts.splice(index, 1);

               // 删除当前selectedPerson,选中态前移一位
               index = (index < this.addrBook.contacts.length) ? index : index - 1;

               // 如果contract被删除完,则设置me为选中态
               this.selectedPerson = (index >= 0) ? this.addrBook.contacts[index] : this.addrBook.me;
             })
         }
       }

     }
   }
 }

 @Component
 struct AddressBookView {
   @ObjectLink me: Person;
   @ObjectLink contacts: ObservedArray<Person>;
   @State selectedPerson: Person = new Person("", "", 0, "", []);

   aboutToAppear() {
     this.selectedPerson = this.me;
   }

   build() {
     Flex({ direction: FlexDirection.Column, justifyContent: FlexAlign.Start }) {
       Text("Me:")
       PersonView({ person: this.me, phones: this.me.phones, selectedPerson: this.selectedPerson })

       Divider().height(8)

       ForEach(this.contacts, (contact: Person) => {
         PersonView({ person: contact, phones: contact.phones as ObservedArray<string>, selectedPerson: this.selectedPerson })
       },
         (contact: Person): string => { return contact.id_; }
       )

       Divider().height(8)

       Text("Edit:")
       PersonEditView({
         selectedPerson: this.selectedPerson,
         name: this.selectedPerson.name,
         address: this.selectedPerson.address,
         phones: this.selectedPerson.phones
       })
     }
     .borderStyle(BorderStyle.Solid).borderWidth(5).borderColor(0xAFEEEE).borderRadius(5)
   }
 }

 @Entry
 @Component
 struct PageEntry {
   @Provide addrBook: AddressBook = new AddressBook(
     new Person("Gigi", "Itamerenkatu 9", 180, "Helsinki", ["18*********", "18*********", "18*********"]),
     [
       new Person("Oly", "Itamerenkatu 9", 180, "Helsinki", ["18*********", "18*********"]),
       new Person("Sam", "Itamerenkatu 9", 180, "Helsinki", ["18*********", "18*********"]),
       new Person("Vivi", "Itamerenkatu 9", 180, "Helsinki", ["18*********", "18*********"]),
     ]);

   build() {
     Column() {
       AddressBookView({ me: this.addrBook.me, contacts: this.addrBook.contacts, selectedPerson: this.addrBook.me })
     }
   }
 }
最后
有很多小伙伴不知道学习哪些鸿蒙开发技术?不知道需要重点掌握哪些鸿蒙应用开发知识点?而且学习时频繁踩坑,最终浪费大量时间。所以有一份实用的鸿蒙(HarmonyOS NEXT)资料用来跟着学习是非常有必要的。
这份鸿蒙(HarmonyOS NEXT)资料包含了鸿蒙开发必掌握的核心知识要点,内容包含了(ArkTS、ArkUI开发组件、Stage模型、多端部署、分布式应用开发、音频、视频、WebGL、OpenHarmony多媒体技术、Napi组件、OpenHarmony内核、Harmony南向开发、鸿蒙项目实战等等)鸿蒙(HarmonyOS NEXT)技术知识点。
希望这一份鸿蒙学习资料能够给大家带来帮助,有需要的小伙伴自行领取,限时开源,先到先得~无套路领取!!
获取这份完整版高清学习路线,请点击→纯血版全套鸿蒙HarmonyOS学习资料
鸿蒙(HarmonyOS NEXT)最新学习路线

-
HarmonOS基础技能

- HarmonOS就业必备技能

- HarmonOS多媒体技术

- 鸿蒙NaPi组件进阶

- HarmonOS高级技能
- 初识HarmonOS内核

- 实战就业级设备开发

有了路线图,怎么能没有学习资料呢,小编也准备了一份联合鸿蒙官方发布笔记整理收纳的一套系统性的鸿蒙(OpenHarmony )学习手册(共计1236页)与鸿蒙(OpenHarmony )开发入门教学视频,内容包含:ArkTS、ArkUI、Web开发、应用模型、资源分类…等知识点。
获取以上完整版高清学习路线,请点击→纯血版全套鸿蒙HarmonyOS学习资料
《鸿蒙 (OpenHarmony)开发入门教学视频》

《鸿蒙生态应用开发V2.0白皮书》

《鸿蒙 (OpenHarmony)开发基础到实战手册》
OpenHarmony北向、南向开发环境搭建

《鸿蒙开发基础》
- ArkTS语言
- 安装DevEco Studio
- 运用你的第一个ArkTS应用
- ArkUI声明式UI开发
- .……

《鸿蒙开发进阶》
- Stage模型入门
- 网络管理
- 数据管理
- 电话服务
- 分布式应用开发
- 通知与窗口管理
- 多媒体技术
- 安全技能
- 任务管理
- WebGL
- 国际化开发
- 应用测试
- DFX面向未来设计
- 鸿蒙系统移植和裁剪定制
- ……

《鸿蒙进阶实战》
- ArkTS实践
- UIAbility应用
- 网络案例
- ……

获取以上完整鸿蒙HarmonyOS学习资料,请点击→纯血版全套鸿蒙HarmonyOS学习资料
总结
总的来说,华为鸿蒙不再兼容安卓,对中年程序员来说是一个挑战,也是一个机会。只有积极应对变化,不断学习和提升自己,他们才能在这个变革的时代中立于不败之地。

由 GitCode & CSDN 共同运营的 HarmonyOS 开发者社区,服务鸿蒙开发者,帮助开发者快速了解鸿蒙、学习鸿蒙、获取最新最全的鸿蒙开发者资料与体系课程,共同赋能鸿蒙生态。
更多推荐


 42
42 0
0- 0


 已为社区贡献3条内容

所有评论(0)